There are several instances, where during an emergency you needed to unlock an iPhone without the password. The situation may arise when you forget about your iPhone password, or your naughty kid accidentally locked your iPhone.
While the easiest way around is to try different combinations in order to unlock iPhone. But right after 10 tries, you are going to receive the following message, ‘iPhone is disabled, connect to iTunes.’ After all, you wouldn’t stay with a disabled iPhone in the first place.
In this article, we are going to discuss some of the most prominent ways in which you can unlock your iPhone. If you have an iCloud backup, you can also completely erase your iPhone, and restore accordingly.
Also Read: How to Back Up iPhone
Method 1: Unlock your iPhone using Computer
In this process, you need a working Mac or PC. For anyone using a Windows computer, make sure to have Windows 8 or later installed along with iTunes. Another prerequisite involves either lightening-to-USB A or lightening-to-USB C cable to connect your iPhone based on your requirements.
Step 1: Turning Off your iPhone
1. If connected, first unplug your iPhone from any other device.
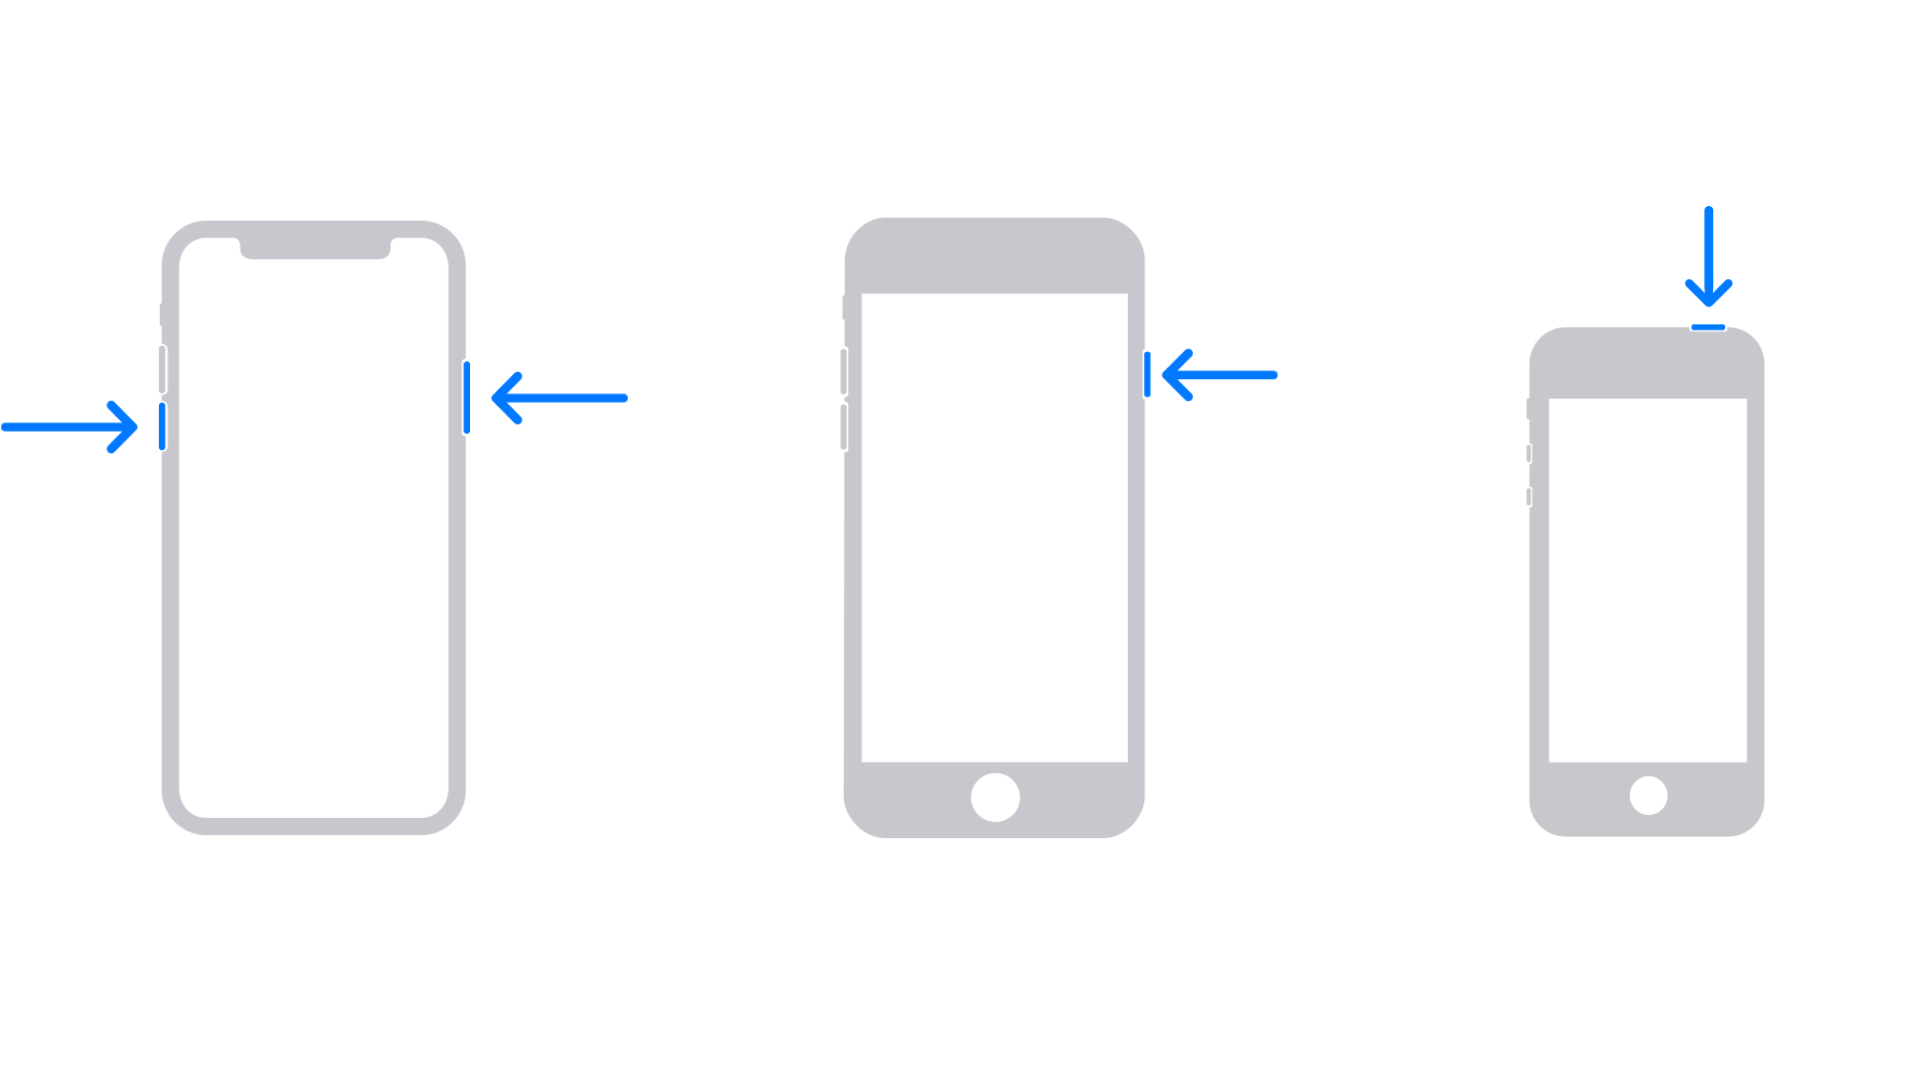
2. Turn off your iPhone based on the method mentioned for each model.

| For iPhone 8, 8 Plus, X and later models, including the 2nd and 3rd generation iPhone SE, press and hold the volume down and side button. | With iPhone 6, 6 Plus, 7 and 7 Plus, press and hold the power button until the power slider appears. | For 1st Generation iPhone SE, 5s and earlier, press and hold the power button at the top until the power slider appears. |
3. Drag the slider towards the right to turn off your iPhone. Wait for new moments until your iPhone is completely turned off.
Step 2: Putting your iPhone into Recovery Mode
1. This is where you need to press a combination of buttons to put your iPhone into recovery mode.

| For iPhone 8, 8 Plus, X and later models, including the 2nd and 3rd generation iPhone SE, you need to use the power button. | With iPhone 6, 6 Plus, 7 and 7 Plus, go with the volume down button. | For 1st Generation iPhone SE, 6s, 5s and earlier, you need to use the Home button. |
2. Press and hold the corresponding button on your iPhone as mentioned above. Now connect the iPhone to your computer without letting go of the button.

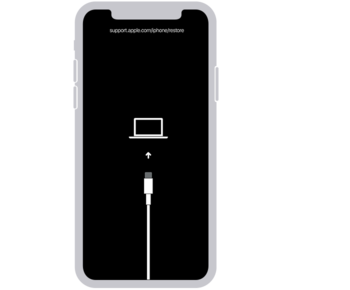
3. Hold the button until you find the recovery mode screen right on your iPhone. Now you can let go of the button.
Note: In case you come across the password screen, repeat the steps once again.
Step 3: Restoring your iPhone
1. The first and foremost task is to locate your iPhone on iTunes. Check on your computer whether it is connected or not.
2. Click on Restore whenever the option to Restore or Update appears. Let your iPhone download the software and finish the restore process. In case the downloading process takes more than 15 minutes, your device would exit the recovery mode. Wait until the download is completed and start the process again.

3. Wait for the entire process to finish.
4. Now you can disconnect the iPhone, and set up your device accordingly.
Read: How to Turn Off iPhone 12
Method 2: Unlock your iPhone Using Find my iPhone
In case you don’t have access to your PC or Mac but want to access your iPhone right away, you can always use Find my iPhone. It is just a matter of minutes to completely clean up your iPhone. You can also remotely restore your iPhone data, using this method.
Bear in mind, one of the perquisites involves ‘Find my iPhone’ should be turned on beforehand. Now follow the step down below to unlock your iPhone without a password.
Step 1: If you don’t have access to any computer or Mac device, use someone else’s iPhone. Go to icloud.com/find and sign in with your Apple ID.

Step 2: Select the option, ‘All Devices’, and pick your locked iPhone from the list. Top on your iPhone and select the ‘Erase iPhone’ option. This way, all of your iPhone data along with the password would be removed from the device.
Note: Your iPhone is going to reboot without a password. So you should restore your iPhone data right away.
Method 3: Unlock iPhone Using Third-Party App
This goes without saying, using Apple’s proprietary methods can get tedious at times. Using any third-party app like Dr.Fone: Screen Unlock can make the entire process seamless. While we use the example of the given software, you can also choose anything that works the best for you. So follow the steps down below to unlock your iPhone:
Step 1: First, download the Dr.Fone software on your PC or Mac. Now click on ‘Screen Unlock’ to proceed forward.

Step 2: Use the lightning to USB cable to connect your iPhone to the computer.
Step 3: Once you enable your iPhone to Dr.Fone, you can view the Unlock window. Click on Unlock iOS Screen to start the unlocking process.

Step 4: Simply follow through with the on-screen instructions to enter into your iPhone’s DFU mode.

Step 5: The tool is capable of detecting all the relevant information on your iPhone. This includes your device model, along with the iOS version. Confirm the displayed information and click on Start.

Step 6: Once Dr.Fone downloads the firmware, it would prompt you to erase the password. Furthermore, click on the Unlock Now button to proceed forward. Confirm the operation and it would erase your iPhone data.

Step 7: Wait for a couple of minutes, until your iPhone lock screen is completely removed. Once your iPhone reboots, it would be like a completely new one.

This is by far one of the easiest ways how to unlock iPhone without using iTunes whatsoever.
Read: How to Find Downloads Folder on iPhone or iPad
Concluding Words
So that was our curated guide on how you can unlock iPhone using various methods. Now, if you are someone who is well within the Apple ecosystem, our recommendation would be to pick from the first two methods.
As for the Windows side of things, or you prefer a seamless process altogether Dr.Fone has got you covered. Let us know in the comment section below, how was your experience altogether?


