When it comes to making your photos look amazing in GIMP, simplicity and effectiveness matter. Among GIMP’s array of tools, the Clone tool is a standout, offering great versatility. In this guide, I will share how to use the Clone tool in GIMP, breaking down the steps so you can get started right away. Having spent considerable time with GIMP, I’ve found the Clone tool to be a real game-changer. This article is your go-to resource to understand and master the Clone tool in GIMP. So, without any further ado, let’s get started!
Also Read: How to Mask in GIMP and How to Crop Image in GIMP
What is GIMP Clone Tool?
Just like several other excellent tools in GIMP, the Clone tool is another essential tool used in editing digital images. It is simple yet one of the most crucial tools.
The Clone Tool helps you copy a particular portion of an image to other sectors of that same image. For example, suppose you have a digital image with a specific area damaged or pixelated. In that case, you can repair it by cloning a good sector of that image and replacing the bad place with it.
It’s one of the most used tools offered by advanced image editors to correct images. You only need a brush, adjust its settings as per requirements, and with a little knowledge, you’re good to go!
Why Clone Tool is Important?
Suppose that you have an image that somehow got damaged. What if I tell you that you can repair the image digitally? Yes. It is possible with the clone tool, which is why most digital artists hail this tool as the saviour.
The clone tool uses the pixels of the good area of an image and paints it to the bad sectors using the current brush. Depending on the subject and the area, you can modify the brush settings and get a perfect image as an output.
Note: Bear in mind that although the clone tool is straightforward, Cloning isn’t. It takes a lot of practice to perfect the art of Cloning. On top of that, you need to understand the color profile and pixel density of an image’s good and bad areas to repair them.
How to Use Clone Using GIMP?
As mentioned before, the GIMP clone tool is straightforward to use, and with a few clicks, you can easily apply it to an image. Here are the steps to follow:
Step 1: Open An Image
As discussed in the previous GIMP tutorial articles, open an image by going to File > Open As Layers.

Alternatively, you can drag and drop an image directly from your hard drive to GIMP.
In this example, I’m using an image of a hot-air balloon, and I will clone the tiny hot-air balloon and palace it twice in the picture.

Step 2: Select the Clone Stamp Tool
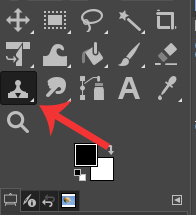
Select the Clone Stamp Tool from the toolbar by clicking on the icon below.

Now, take your cursor to the portion you want to clone. In the GIMP Clone Tool, the mouse pointer appears as a dotted circle.

I am selecting the little hot-air balloon as my target in the example.
Step 3: Make Adjustments
Depending on the size of the source portion, you’ll have to adjust the dotted circle. You can do it by modifying the Clone Menu Box.
Here, I increased the brush size to accommodate the small hot-air balloon. I have increased the brush size by pressing “[” and “].”

Alternatively, you can expand it by the Size bar in the Clone Tool Box.

Step 4: Make a Selection.
When satisfied with the selection size, press Ctrl on your keyboard and left-click once in the area.
The target area will be highlighted using a dotted circle.

In the example, notice how the small hot-air balloon is highlighted.
Step 5: Stamp in The Target Area
Finally, move your cursor to the area you want the Cloning to be applied to by left-clicking once.
I repeated Step 5 twice to make three small hot-air balloons.

And that’s it!
Recommended: 10 Best GIMP Brushes You Can Use
Conclusion
It’s this easy. However, don’t feel arrogant yet. You might not be cloning a small hot-air balloon in your next assignment. Try it out with different examples and learn the art of Cloning. If you have any doubts, you can leave a query below, and we’ll surely get back to you with a solution. Till then, happy Cloning!


