No matter how well you design a creative artwork, poster, or anything, there is one thing that makes or breaks your whole effort. The font. Yes! It is that important. Try using the Arial font in a part poster, and you’ll know what I am talking about.
Choosing the right font to go with your design is a crucial factor. And for this very reason, you need to have proper knowledge of what font goes well with what?
But don’t worry, even if you are not aware of all the font families but are only attracted to the font you have seen on the internet and want to use, this article will guide you to download and install the font on your PC. Subsequently, we will teach you to add them to GIMP. So, if you’re someone who wants to learn about how to add fonts to GIMP, read on.
Recommended: 10 Cool Free Fonts for GIMP
How To Download Fonts?
Downloading a font is an easy task. Several excellent websites offer free downloads—moreover, there are plenty that offers both free as well as premium fonts.
Google Fonts is my favourite. It provides several fantastic fonts to use in my creatives. They are absolutely free to download. Furthermore, you can download the entire font family with just a click. Here’s how.
Step 1: Go to Google Fonts by clicking on this link.
Step 2: You’ll have a list of popular fonts along with their preview in front of you.
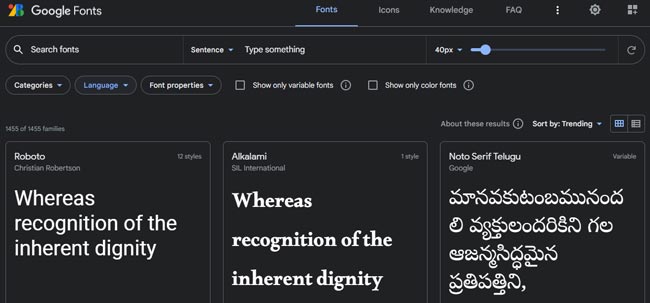
Step 3: Choose the one you like, and click on the download font family option.

Some other sources to download GIMP fonts are Font Squirrel, DaFont, etc.
How to Install Fonts on Your PC?
Once you have downloaded the font, it will show in a .zip file. Extract it to obtain the font installation file. Below are the instructions to install them.
Step 1: Open the folder where the downloaded fonts are. Double-click on the font you want to install.

Step 2: A window pops up. Click on the install button, and you are done.

How To Add Fonts To GIMP?
Now that you have installed the fonts on your PC, it is time to add them to GIMP.
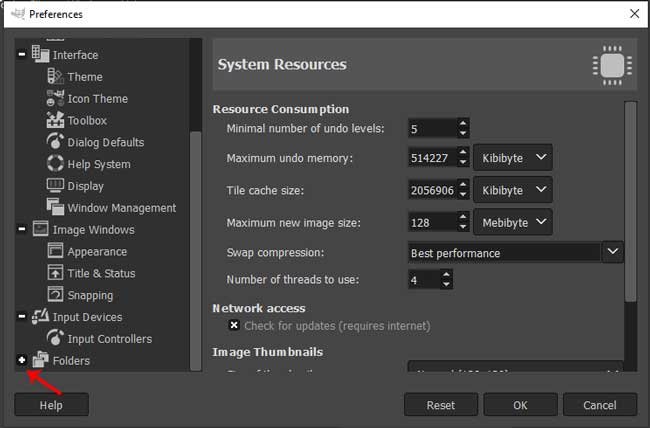
Step 1: Go to Edit > Preferences.

Step 2: Scroll down and locate Folders; click the “+” icon beside it to expand.
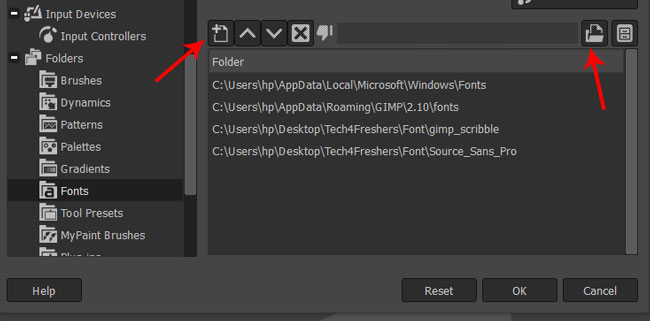
Step 3: Scroll down a bit, and click on Fonts.

Step 4: Once the Font section is opened, click on the add folder icon (first icon from the left).
Step 5: Next, click on the locate files or folder icon (second from right-corner) and select the font, And that’s it. The new font is now added to GIMP.
How To Use Added Fonts In GIMP?
After adding the newly downloaded font to GIMP, you need to update the GIMP fonts list to use them. It is also a simple process-
Step 1: Go to Windows > Dockable Dialogs.

Step 2: Scroll down and locate Fonts and click on it.
Step 3: The fonts dialog box will open the right part of GIMP. Observe a reload icon that says, “Rescan the installed fonts.”

How To Remove Fonts From GIMP?
Removing the fonts from GIMP is as easy as adding them. Reopen Edit > Preferences > Fonts and remove the folder you don’t want to use, and that’ll do.
Recommended: 10 Best GIMP Brushes You Can Use
Conclusion
I hope your queries regarding how to add fonts to GIMP are resolved. It’s a simple process that doesn’t require any technical knowledge. Just follow the instructions mentioned above, and you’re good to go! Like always, if you have any queries, mention them below so that we can assist you.
Moreover, go to authentic websites to download fonts. Stay away from a malicious website that will harm your computer. Till next time!


")


")