Now that Microsoft has started to roll out Windows 11, there is a list of factors that we need to look for, prior to upgrading. Support for TPM 2.0 is one such concept, that Microsoft introduced out of the blue.
For anyone reading this article, chances are you must have encountered the TPM 2.0 error. Or even downright confused on how to enable TPM 2.0 on your Windows machine. In this article, we are going to discuss What is TPM and how to enable TPM 2.0 as per Microsoft’s requirements.
What is TPM?
TPM, an abbreviation for Trusted Platform Module (also known as ISO/IEC 11889) is a secure encryption processor by international standards. The TPM chip in itself is a dedicated microcontroller that protects the hardware using integrated cryptographic keys.
Either the TPM chip comes integrated with the processor or added to the motherboard. From October 1999 to March 2003, a joint venture by Microsoft, IBM, Sony, and HP sponsored the Trusted Computing Group (TCG).

The sole purpose was to create a TPM standard with specifications that aligns regardless of the hardware and software relevance, and operating environment. The previous edition of TPM, version 1.2 was published back on March 3, 2011. The latest TPM standard is based on version 2.0.
Chipsets that are compliant with the TPM standard, can encrypt and decrypt keys, allowing them to ensure high-speed data encryption. The chip also acts as an auxiliary processor in order to protect the BIOS and OS altogether.
What Does TPM Do?
TMP chips can be used for a plethora of tasks. Starting out with maintaining the device integrity verification, authentification, identification, and encryption. Not to mention, TPM makes sure of device integrity regardless of the OS it is currently running at.
TPM also facilitates hard disk encryption, for example, Microsoft’s Bitlocker. Last but not least, TPM allows operating systems to manage passwords while protecting the data and OS altogether. TPM offers better security as compared to any BIOS password management option.
Why TPM 2.0 is Required for Windows 11?
This goes without saying, Microsoft has taken a serious approach to its system security. This can be achieved by ensuring hardware that is directly linked to the OS, i.e. TPM 2.0.
While Windows 10 can run seamlessly without the need for TPM, Windows 11 specifically requires support for TPM 2.0. Using the TPM 2.0, Windows can mitigate the risks of security threats to a certain degree.
That is why, it has become a mandate to equip systems with TPM 2.0, especially manufacturing Windows machines. It is applicable for both OEMs manufacturing PC components, as well as laptops and 2-in-1 devices.
Even though the device comes pre-loaded with Windows 10, TPM 2.0 must be included and enabled by default.
How to Check if Your Computer has TPM 2.0 Chip
In case your Windows PC meets all the Windows 11 minimum system requirements, chances are it supports TPM 2.0 as well. Since 2016, every PC comes with TPM 2.0. So, follow the steps down below to check whether TPM 2.0 is available on your PC or not.
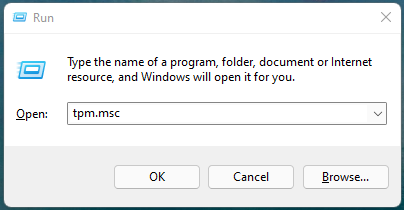
Step 1: Press the ‘Windows Key + R’ to open the Run dialog box.
Step 2: Type in, tpm.msc, and hit enter.

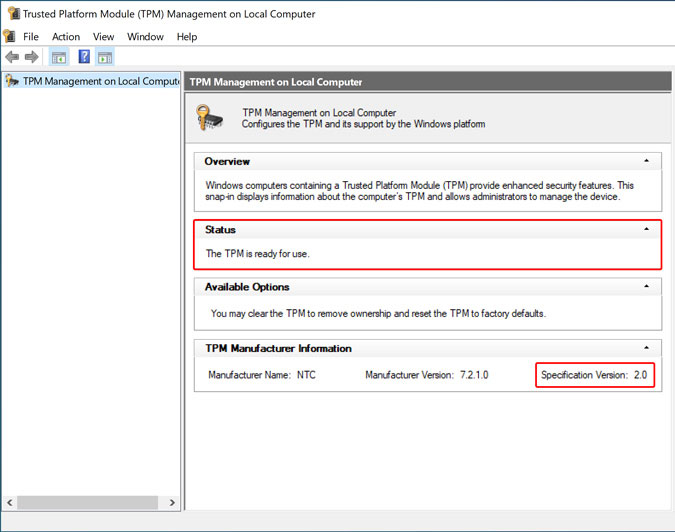
Step 3: You will find the following result as mentioned down below.

Step 4: In case TPM is unavailable, it will show the ‘Compatible TPM cannot be found’ error message.

How to Enable TPM 2.0 for Windows 11
There are instances when your computer fails to detect TPM. Down below is a list of two different ways in which you can enable TPM for Windows 11 from UEFI mode.
Method 1: Enable TPM 2.0 via Settings
Step 1: Press the ‘Windows Key + I’ to bring up the Settings menu.
Step 2: From the left side panel, select ‘Recovery.’ Look for ‘Advanced startup’ and click on ‘Restart now’.

Step 3: Go to Troubleshoot > Advanced options > UEFI Firmware Settings. Now simply select Restart.
Step 4: Head over to the Security Settings and choose the TPM settings configuration option.
Step 5: Enable the TPM in case it shows disabled. Exit the settings and restart your PC.
Method 2: Enable TPM 2.0 Using Boot Maintenance Manager
Step 1: Restart your computer to access the Boot Maintenance Manager. For different manufacturers, you need to press different key combinations. Here’s a list of some of the most popular OEMs:
- Acer: F2 or Del
- ASUS: F2 or Del
- Dell: F2 or F12
- HP: ESC or F10
- Lenovo: F1 or F2
- MSI: DelMicrosoft Surface: Press and hold the Volume Up button
- Samsung: F2
- Toshiba: F2
Step 2: Open the Security Settings page, by navigating the arrow keys.
Step 3: Look for the TPM settings configuration option.
Step 4: Enable the TPM in case it shows disabled. Exit the settings and restart your PC.
Frequently Asked Questions
1. What is the difference between TPM 1.2 and 2.0?
Equipping your hardware with TPM 1.2 only limits the encryption algorithms to use RSA and SHA-1. On the other hand, TPM 2.0, adds more flexibility and versatility. It offers extensive support for all the newer algorithms that can boost key generation performance along with drive signing.
Overall, the TPM 2.0 technology is the latest iteration of the TPM 1.2 standard. Simply put, TPM 2.0 offers better security, stronger encryption, and extensive support for all the newer algorithms.
2. Is it possible to add a TPM chip for the PC?
Even though the question in itself feels tedious, theoretically it is completely possible to add a TPM chip on the motherboard. It is possible with OEMs who add header pins labeled as TPM.
Having extensive hardware and software knowledge can help you along the way. But even acquiring a TPM chip, it needs to be set up with the BIOS so that the OS can recognize it. So, it’s better you don’t end up walking in the path of adding your own TPM chip.
Read: How to Enter BIOS Settings on Windows 10
The Bottom Line
So that was our curated guide on everything you needed to know about TPM. Not to mention, the significance of TPM 2.0 on Windows 11. Basically, TPM is a chip that adds an extra layer of security, on top of BIOS and OS.
If you are running any newer hardware, chances are TPM 2.0 is already present, that you need to turn on manually. Follow the steps above mentioned, and you are good to go.


