Ever heard about SSH? Secure Shell (SSH) is a network protocol that allows you to securely operate network services over an unsecured network. It gives system administrators a secure way to access multiple networks, making it essential to understand and implement. All the latest Windows versions now support OpenSSH, a remote sign-in method that uses the SSH protocol.
Let’s dive into the process of incorporating SSH into Windows and see how it can enhance your network security!
How to Install an SSH Server on Windows 10 or 11?
As mentioned above, all Windows operating systems have an OpenSSH server. Here is the step-by-step guide to enabling the OpenSSH Windows 10 or 11 servers.
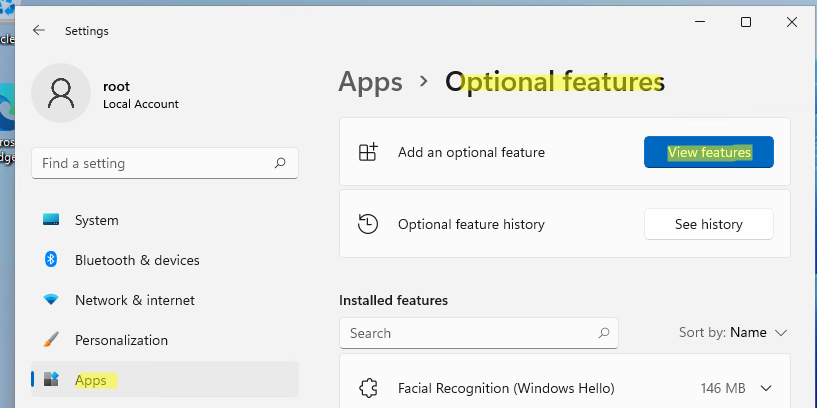
1. Go to Settings > Apps > Apps and features > Optional features, as shown in the screenshot below.
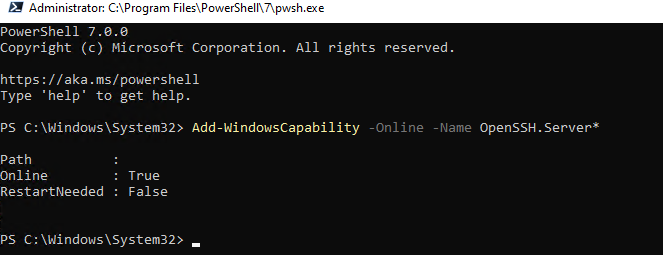
2. Click on ‘Add an optional feature,’ then select OpenSSH Server. Tap on install. You will see the OpenSSH server installation box as shown below.

3. To check if the OpenSSH server is successfully installed, run this command:
Get-WindowsCapability -Online |? Name -like 'OpenSSH.Server*'You will see the below screenshot on your screen.
That’s it!
How to Enable and Configure SSH Server on Windows?
Firstly, it is essential to know the status of the ssh-agent and sshd services. Type in the following command:
Get-Service -Name *ssh*You will see the following message on your screen.
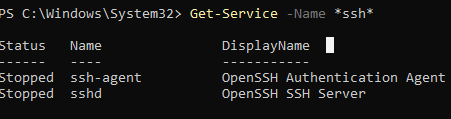
As you can see, both the services display the status ‘stopped’. However, it’s simple to start the OpenSSH services again. Check out the below-mentioned commands:
Start-Service sshdSet-Service -Name sshd -StartupType 'Automatic'Start-Service ssh-agentSet-Service -Name ssh-agent -StartupType 'Automatic'
Please note: whenever the OpenSSH server is installed successfully, a rule permitting remote connections to the SSH server is also added to the Windows Defender firewall. To confirm the same, here is the command you must type:
Get-NetFirewallRule -Name *OpenSSH-Server* |select Name, DisplayName, Description, Enabled
In case the rule is disabled, here is how you can enable it:
Get-NetFirewallRule -Name *OpenSSH-Server*|Enable-NetFirewallRuleHow to Connect to Windows via SSH?
In order to connect from Linux, you can use the following mentioned command:
ssh -p 22 [email protected]Simplifying this command for you: admin represents a local Windows user. 192.168.1.90 is the IP address of the remote Windows host.
As soon as the command prompt window opens, use the Putty client to connect to a Windows computer via SSH:
- Run putty.exe
- Next, you must enter the IP address of the remote Windows host you wish to connect over SSH.
- As shown below, select a connection type and specify Port 22.

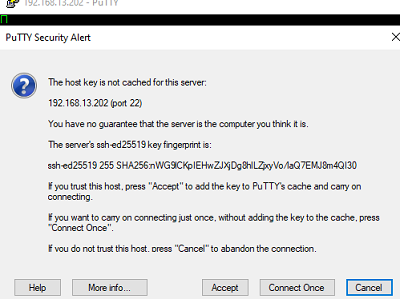
- Tap Open. As soon as you click on it, you will get a security alert dialogue box with details on your screen. Click on Accept, and your server will be added to the SSH hosts.
- To check the current ECDSA fingerprint, simply write this command:

- Now, another window will appear asking for your username and password, as shown below.

- After login, you will see the command prompt of the remote Windows host.
Please note: To connect to another Windows host, use the built-in Windows SSH client. All you have to do is install the ssh.exe and type in the following command:
Add-WindowsCapability -Online -Name OpenSSH.Client*Alternatively, you can use this command to directly connect to a remote SSH host from the Windows command prompt: ssh [email protected].
- As soon as you connect, you must add the fingerprint of the SSH server’s ECDSA key to the other known hosts. Here is how you can do it.

- Enter your password at the end, as shown, and a window will appear.
It is now possible for you to copy a file between hosts using OpenSSH.Client tools. You can use the following command to copy the file to a remote SSH host:
scp.exe D:\PS\test1.log [email protected]:c:\temp
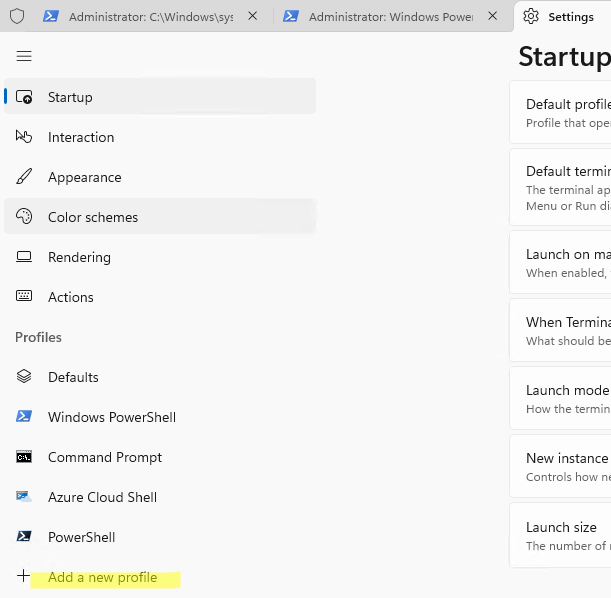
Now, in case you wish to use the Windows terminal, all you have to do is add SSH host profiles in a below-mentioned way:
- Go to Windows Terminal > Settings.
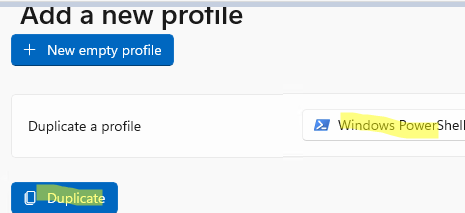
- Tap on ‘Add a new profile’, as shown below.
- Enter a profile name and mention the connection string to your SSH host. Save the profile.
- As you can see below, the window terminal menu will show an option ‘SSH Windows 10 DEVPC’.

Final Remarks
As you can see, installing SSH into Windows 10 or 11 is pretty simple. Network administrators and users must use SSH to have strong network encryption. This network protocol helps you to communicate with remote machines. Further, developers can easily manage remote applications and systems or even share files securely.
We hope the aforementioned information helps you conduct the task easily. Good luck!


")