There are occasions when we need to view more than one application or program simultaneously. To do that, Windows 10 and 11 offer a great feature called the Spilt Screen.
We can easily split our screen into multiple windows using a few simple shortcuts. These shortcuts are similar in Windows 10 and 11. However, there are some additional techniques available in Windows 11 exclusively. This article will guide you on how to split screen in Windows 10/11. Read on to know in detail.
Read: How to Enable God Mode in Windows 11
How to Enable Split Screen?
You must have Multi-tasking enabled for a split screen to work in Windows. To do that:
Step 1: Press Win + X, and choose Settings.

Step 2: Next, choose the System.

Step 3: After that, scroll down and locate Multi-Tasking.
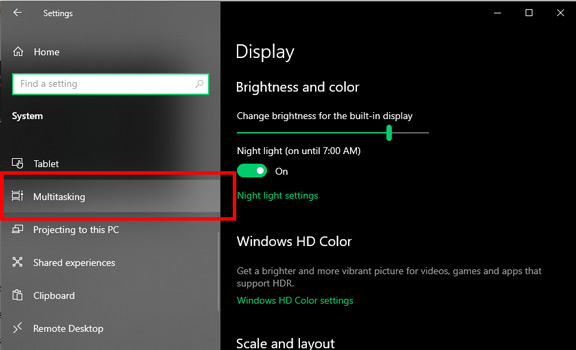
Step 4: Turn on the toggle stating Snap Windows.

Now, you are ready to split your screen.
There are primarily three ways of splitting a windows 10/11 screen. They are:
Method 1: Drag and resize windows manually (Windows 10/11)
Method 2: Use keyboard shortcuts (Windows 10/11)
Method 3: Use the in-built split (Windows 11 exclusive)
We will explain all these methods in detail. Therefore, you will have a complete step-by-step guide.
Method 1: Drag and resize windows manually
It is the most common method. You probably have used it by accident or knowingly at least once, or maybe you are already familiar with this. Let’s understand this with an example.
Suppose you are using Adobe Photoshop and need an internet element. So, you will have to fire up a browser (for example, Chrome) and search for the component. However, you want to look for the element and simultaneously compare it to the artboard you are currently working on. So, you have to open both applications side-by-side. To do this –
Step 1: Manually drag Adobe Photoshop and hold it in any suitable corner.

Step 2: Wait till you see the splitting indication.
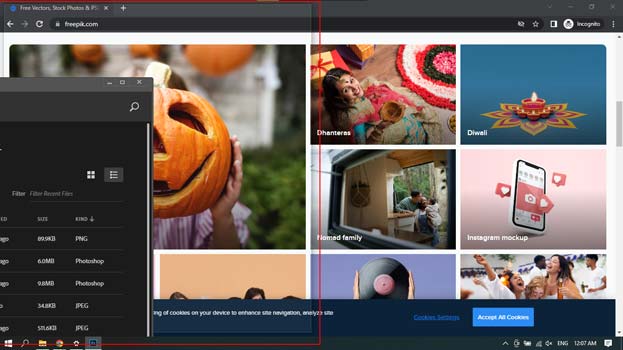
Step 3: Release the click, and the window will be resized.
Step 4: Repeat Steps 1-3 but do it on the other half of your windows screen.
It is the easiest way to split the screen in half or split the screen in two.
You can also use this method to arrange 2, 3, or more windows. Just move to the corner of the window you want to resize, and you’ll notice the resize sign. You can use this method to split screens in Windows 10 and 11.
Also Read: 8 Tips to Improve Battery Life on Windows 11
Method 2: Use Keyboard Shortcuts (Windows 10/11)
Shortcuts make our work very straightforward. A few shortcuts can also control few The Split Screen action in Windows with the help of a few key combinations.
Step 1: Select the Photoshop window and press the Win + Left-Arrow key to align it left of your screen.
Step 2: Tap Alt + Tab to switch to Chrome.
Step 3: Now, press Win + Right-arrow to align Chrome in the right part of your screen.

As you can see, we have just aligned two windows side-by-side with the help of shortcuts. This method works in both Windows 10 and 11.
It is possible to use keyboard shortcuts for arranging more than two screens, and you must repeatedly press Win + Left/Right Arrow keys until they are placed as desired. Also, keep in mind to switch to the next window by either pressing Alt + Tab or selecting manually.
The Arrow keys and Window key combination is also used to minimize the window, So don’t be alarmed if you encounter this anytime during the screen-splitting process.
Also Read: How to Get Help in Windows 11
Method 3: Use the in-built Split (Windows 11 exclusive)
Are you using Windows 11 and looking for answers regarding how to split screen? There is no easy way than this. Windows 11 have a dedicated button to split screen in 2, 3, and 4.
Step 1: Open any application or window.
Step 2: Now, go to the restore/maximize button beside the Close Window option.
Step 3: You will notice a split screen option.
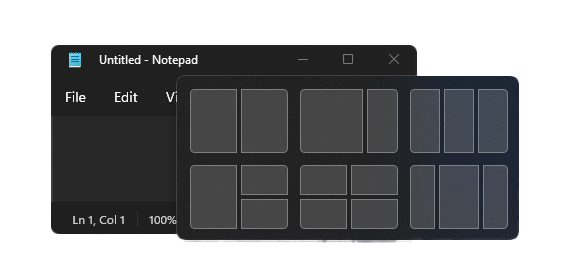
Step 4: Look carefully; the section your selection gets highlighted and places the current window in that position. Go ahead and choose your desired position.
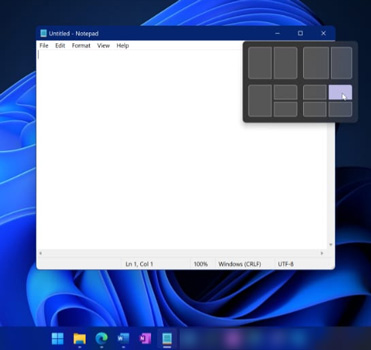
Step 5: Repeat Steps 1-4 to get your desired positioning.
Please note that this option is only available in Windows 11.
Recommended: 7 Best Music Recording Software You Can Use
Final Thought: Split Screen in Windows 10/11
So, that was a guide on how to split screens in Windows 10 and 11. All of these processes are simple and easy to execute. You don’t have to worry about data loss as the process doesn’t close any windows, leaving your work unsaved.
In Windows 11, you can split screens more quickly than in Windows 10. But there is no need to worry! You already know that there is no rocket science behind it. Happy Splitting!


")