Making an image transparent is one of the important requirements for web designers, mockup artists, or sometimes even end users. Several image editing techniques require the removal of the image background in the very first place.
GIMP allows you to remove the background of your images in just a few clicks. Furthermore, you can easily replace the background with any other image.
In this article, we will share how you can make the image background transparent in GIMP. We will also have a brief look at removing complex backgrounds. So, hold tight! Start GIMP, and let’s get this journey started.
You can also read our articles on how to mask in GIMP, cool free fonts for GIMP and the best GIMP brushes.
How to Make Background Transparent in GIMP?
Step 1: Open the Image
GIMP is an excellent tool for editing images with various colour profiles. You might see a dialog box asking you to convert the image to RGB working space when opening an image, and that is because the image contains an embedded color profile.
In this example, we are going with a standard image. So, we don’t encounter such an option. Though not important here, it is always advised to open the image as layers while editing images in GIMP. It will help you develop a good editing habit.
To do that, go to File > Open As Layers.

Step 2: Select Unwanted Background
Now that you have opened the image, it now time to select the background that you want to remove. There is more than one way to do that. For the sake of this tutorial, we are going with the simplest method, the Fuzzy Selection Tool.

The Fuzzy Selection Tool is a great way to select an uncomplicated background. You just need to click on any part of the unwanted background, which will select the entire area with a similar color profile.
For the most part, it automatically selects the entire background without the main object. However, if it fails to choose the entire unwanted backgrounds, you can tweak and select more areas by changing the mode to Add to Current Selection or pressing Shift and then clicking on unselected parts.

After selecting all the unwanted backgrounds, proceed to the next step.
Step 3: Adding Transparency
It’s the most crucial part to take care of while making a background transparent. Normally, an Alpha Channel is automatically added to the channel dialog after adding a second layer. However, if it fails, you can manually do so.
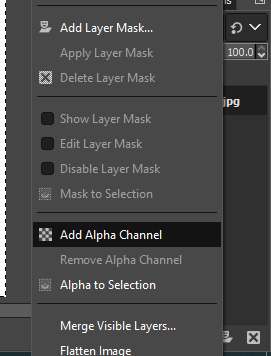
Go to Layer > Transparency > Add Alpha Channel.

Alternatively, you can right-click the image layer on the layers section and click on Add Alpha Channel.
It’s imperative to add this transparency information to the image to make the background transparent.
Step 4: Deleting the Background
When you are done with selecting and adding an Alpha Channel, you have completed all the necessary parts of GIMP to make the background transparent. Finally, press the Delete key on your keyboard to remove the background and make it transparent.

Note: You might see some portions of the image where the background is still attached. Don’t worry! You can always repeat Steps 2 to Step 4 and fine-tune your image.
Step 5: Saving Your Image
At last, save your image by going to File > Export As. Enter a file name of your choice, select the file type as PNG, and click on Export!

Remove Complex Backgrounds
The above method works primarily on solid or straightforward backgrounds. However, you must follow a different route in case of complicated background.
Step 1: Open your image.
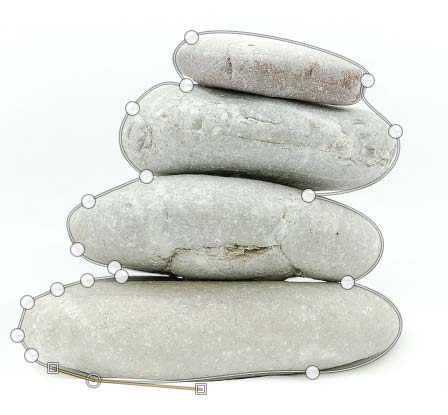
Step 2: Select the Path Tool.

Step 3: Make a precise selection outline on your subject.
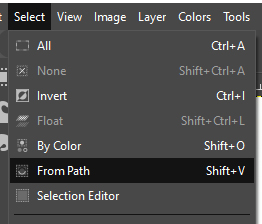
Step 4: Replace the section by Path by selecting the menu, Select > From Path.
Step 5: Add an Alpha Channel
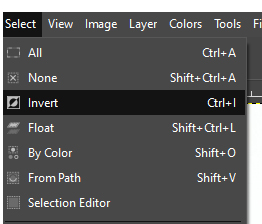
Step 6: Now go to Select > Invert, and make an invert selection of unwanted background.
Step 7: Press the Delete key on your keyboard.

Step 8: Save your image by exporting it to PNG.
You will also like – How to Remove Background From Image Quickly
Ending Words
There you have it- an easy and to-the-point tutorial on how to make the background transparent in GIMP. There are several ways by which you can add transparency to your images, and you can mostly make a transparent background with the method we discussed above. If you’re having any problems with any steps, feel free to ask in the comments below. You can also check our articles if you want to learn about masking and resizing images on GIMP.


")


")