There can be a zillion reasons for resizing an image. But for the most part, image resizing is required for web publishing, social media upload, and sharing. It is one of the most used features in image editing software.
In this article, we will share how to resize an image in GIMP. This is another article in the GIMP series in which we have already covered how to mask in GIMP, how to crop in GIMP, how to use clone tool in GIMP and many other useful articles. Make sure to check them out as well.
For the sake of writing this article, I have used GIMP on a Windows PC but the process is similar on macOS and Linux also. So, without any further ado, let’s get started!
How to Resize An Image In GIMP?
Step 1: Open Your Image
Fire up GIMP and click on File > Open from the menu. If you’re used to dragging and dropping, go ahead and drag your image into GIMP and drop it onto a vacant workspace in GIMP.

Step 2: Convert to RGB Working Space
When you open or drag and drop a file into a GIMP workspace. You’ll see a pop-up (see the picture below).

It occurs due to an embedded color profile on the image. If you are not looking for any other image editing other than resizing, then go ahead and select Convert.
Step 3: Scale Image
Thus far, you have done the basic image importing correctly. Now, observe the top menu and find “Image.” Then select the Scale Image Option.

Step 4: Enter Your Size
After clicking on Scale Image, a new pop-up will occur. Here, you can put your required values and scale your Image. But before that, let me explain you about the various options here.

Image Size: The current size of the imported image is represented in pixels. Mostly, all the photo editing software indicates image size in pixels. However, you can also change it to other values.
Chain-Like Icon: It is a very important part to consider while resizing an image. When activated, the chain icon will keep the Image’s aspect ratio the same. When deactivated, you can put any value in the height/width box, and it will change its dimensions.

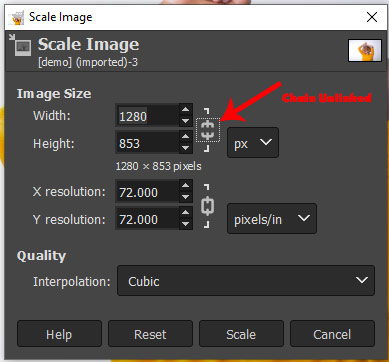
When active, you can enter either height or width and hit Enter on your keyboard (or click on the other box). The Chain-link will automatically resize the Image based on your input, maintaining the original aspect ratio.
If you unlink the chain from height to width, you may see an unpleasant image represented in front of you. So, we suggest you keep it active.
X/Y Resolution: Let’s leave it for another day. Otherwise, we might get derailed from our goal here.
The same goes for pixels/inch and the Interpolation method.
Step 5: Click on Scale
After entering your desired height and width, or only any of it (in case of an active chain link), click on Scale.

Note: Keep an eye on the zoom section in GIMP. It is located at the bottom bar. Set it to 100% to see the actual view.

If satisfied with the output, you need to move on to Step 6. However, if you are unhappy with the output and want to redo the scaling, simply press the magical Ctrl+Z on your keyboard, and it will redo the action. Alternatively, you can go to Edit > Undo Scale Image to revert to the original.
Step 6: Saving An Image
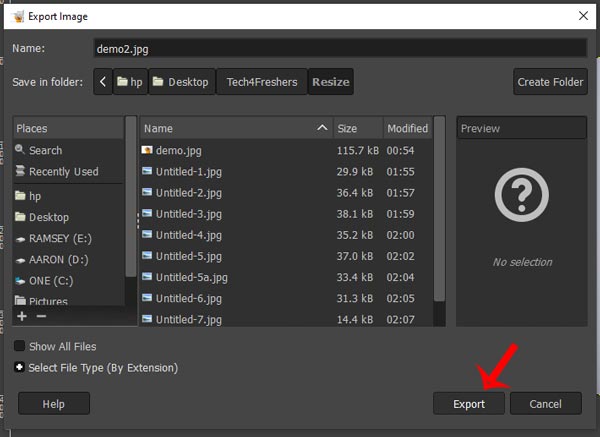
Once you are happy with the Image, it’s time to export your Image. There are numerous file formats to save your Image.
Go to File > Export File As.. to start the export process.

Note: By default, the original file format is attached to your resized Image. GIMP keeps the source and edited file type the same. However, you can change it to your liking.
Enter a new file name, Select File Type (By Extension), and click on Export.
Congratulations! You have successfully resized an image in GIMP.
Recommended: Photoshop vs GIMP – The Major Differences
Conclusion
Resizing an image in GIMP is pretty easy! All you need is the output file size, and you’re good to go. For your convenience, the final file size (in MB) is shown after you have imported and resized an image in GIMP. It is a great way to keep track of the desired output size, as there can be limitations when uploading it to the website, social media, or any other file-sharing medium.
We hope that this guide resolved all your Image resizing queries. Still, got a question? Let us know below!


")


")