Windows 10’s Disk Cleanup utility allows you to get rid of junk files and free up storage space. You don’t have to manually search for the tool and clean up the storage space. This in-built utility tool would automatically clean up junk files and ensure that your system runs the best.
Oftentimes, the tool would choose selected junk files. But before that, we suggest you review all these files so that you don’t miss out on important documents. The main purpose of disk cleanup is to organize, update, and clarify existing files.
Today, we will discuss how to use Disk Cleanup in Windows 10. But before that let’s see what disk cleanup does.
Also Read: Windows 10 Explorer Keeps Crashing? Here are 9 Solutions!
What Does Disk Cleanup Do?
Disk Cleanup helps you to delete all the unnecessary files taking up space on your system. You can manually search for Disk Cleanup and delete temporary files, cache files, and program files from your system. Removing all these files helps speed up your PC. You can routinely run disk cleanup on your system for improved performance.
How to Use Disk Cleanup to Remove Unwanted Files
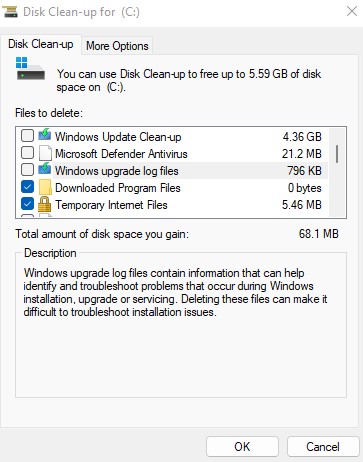
Step 1: Firstly, launch the disk cleanup tool on your system. For that, you have to click on the Start button and search for “Disk Cleanup” and then click on that.

Step 2: Now, you have to select the drive you want to clean up and click on OK. Wait for a while until the tool finds all the unnecessary files.

Reminder: The tool may recommend deleting “Windows ESD Installation Files,” but don’t delete them. These Windows ESD installation files are related to the feature “Reset this PC”. If you have to factory reset your PC in the future, then don’t opt for Windows ESD Installation Files deletion.
What Each File Type Means In Disk Cleanup
1. Downloaded Program Files: These files are ActiveX controls and Java programs that are downloaded automatically from the Internet when you view specific websites. The files are temporarily saved in the downloaded program folder, and you can easily delete them.
2. Temporary Internet Files: When you view certain websites from the browser, temporary cache files are stored on your computer. The temporary internet files generally consist of texts and pictures.
3. Windows Error Reports and Feedback: Windows Error Reports and Feedback is a crash reporting technology that detects hardware and software issues. You can report the issues to Microsoft and a resolution would be offered. You can also delete these reports and feedback.
4. Delivery Optimization Files: These files are part of the Microsoft Windows Update Delivery Optimization service. It was first introduced by Windows 10 and enables your computer to get updates or send updates to other PCs.
5. Recycle Bin: When you delete files from your PC, they are stored in Recycle Bin. You can either restore those files or delete them permanently from the system.
6. Temporary Files: Temporary files are generated when several software programs are running on your system. The PC temporarily stores data for the smooth functioning of software programs.
7. Thumbnails: You would see thumbnails on several file types. Disk Cleanup allows you to get rid of these unwanted thumbnails.
Clean Disk on Windows with Third-Party Software
You can also rely on a third-party tool for disk cleanup on your system. Follow this step-to-step guide to clean the Disk on Windows with third-party software.
Step 1: Firstly, install and launch AOMEI Partition Assistant on your system.

Step 2: After that, you would see several folders on the screen. For disk cleanup on Windows, choose the folder you want to delete and right-click on that. Now select Wipe Partition/Format Partition.
Note: If you want to clear the system storage, then select the whole hard drive and then right-click it. Next, select Wipe Hard Drive from the given options.
Step 3: Now select “Fill Sectors with Zero” and click on “OK”.
Step 4: At the final stage, you have to click on “Apply” to submit all the operations.
Uninstall Programs with Disk Cleanup
It is better to uninstall desktop programs that are not needed. Disk Cleanup tool allows you to manage your storage and uninstall these programs without leaving any trace behind.
Step 1: Launch Disk Cleanup on your system.
Step 2: Now choose the “More Options” tab on the Desk Cleanup pop-up window.

Step 3: Under the Programs and Features section, select the “Clean Up” button.
Step 4: Now you would be redirected to the Control Panel pop-up. The pop-up states, “Uninstall or Change a Program.” You have the option to manage your programs here.

Also Read: How to Fix “Network Discovery is Turned Off” Error in Windows 10 and 11
Concluding Words
Disk Cleanup helps you reduce the number of unwanted files on your PC and overall improves the performance of your system. With time, PCs seem to get slower, so make sure you free up resources periodically.


")