With today’s PC offering a various energy-saving solution, especially with laptops that comes with batteries doesn’t require to be plugged in all the time. This, in turn, introduces us to some of the power-saving options including Hibernation mode (also termed as Suspend to Disk). Right before your OS shuts down, it stores all the important current user data to the hard disk.
This enables you to use the computer exactly where you left off right after waking up from hibernation. But such a great feature can often backfire, where you might end up with huge hiberfil.sys on your hard drive. This is the system file that is often associated with storing up the user data. That is why, we have curated this article, offering various ways you can remove hiberfil.sys.
Also Read: What is “COM Surrogate” (dllhost.exe) in Windows Task Manager
What is hiberfil.sys file?
Hiberfil.sys is the system file that is often associated with the Windows Operating System containing the current memory contents. This information is saved when the computer is kept idle in ‘Sleep’ or ‘Hibernate’ mode. The hiberfil.sys file is created and managed by the system alone, which extends to several gigabytes based on the version of Windows. For Windows 10, the file can easily extend to 3 to 5 GB. This file is used when the system boots from sleep or hibernate mode.
Note: The Hybrid Sleep is something that is a combination of both the Sleep and Hibernate mode and only some of the core system components like hard drives are shut down.
How to Disable Hibernate Mode in Windows 10, 8.1, 8, 7, and Vista
Regardless of the version of Windows you are using, disabling hibernate mode is almost the same. Use the command prompt with administrative privileges to disable the file. Bear in mind, disabling hiberfil.sys automatically deletes the file. Follow the steps down below to properly disable the file:
1. At first, open the command prompt. Just head over to the start menu and type in ‘command prompt’. Once the program shows up, right-click on and select ‘Run as administrator.’
2. Once the command prompt opens, use the following command.
powercfg -h off
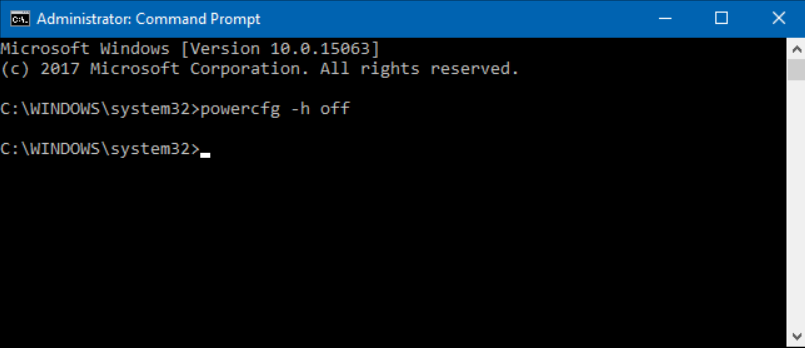
This command disables the ‘hibernate mode.’ You can head over to the shutdown menu to check the option completely gone. Similarly, the hiberfil.sys file is deleted, while you get back your disk space.
How to Disable Hibernate Mode in Windows XP
The steps to disable hibernate mode in Windows XP are completely different than any other version of Windows. In order to properly delete the hiberfil.sys file, follow the steps down below:
- Head over to the control panel and choose ‘Power Options’
- Under the properties window, select the ‘Hibernate’ tab and untick ‘Enable Hibernation’ option.

- Right after you disable the hibernate mode, give your PC a quick restart. Now, manually delete the hiberfil.sys file from your computer.
Also Read: What is Windows Modules Installer Worker?
The Bottom Line
This goes without saying, the hiberfil.sys is one of the most effective programs of the Windows OS. At the time of need, it can be helpful towards saving user data. But, in case it malfunctions, make sure to follow the guide on how to delete hiberfil.sys and give your Windows that extra space.


")


")