Google recently rolled out the third developer preview version of upcoming Android P. They also confirmed that the next update will be the final release of Android 9 or Android P. The search giant has done many additions to this update such as Final APIs, a Clear All button in the recent task, etc. Google has also added 157 new emojis to the new Android version. Android fans are eagerly waiting to try these new features of Android P on their smartphones. But if you are using a non-pixel device and still want to try these cool new emojis and fonts, there’s a way out for you. Today, I will show you how to Install Android P Emojis and Fonts on Any Android Device.
Install Android P Emojis and Fonts on Any Android Device
Note: The following method makes use of Magisk module. Magisk is an in-house development project by XDA developer topjohnwu, focused on providing root access to the user system-less-ly. After the arrival of Google’s Safety Net, Magisk is currently the best alternative to Super SU. So, first, ensure that your Android device is rooted with Magisk. if not, you can follow the full tutorial here.
1. First, download the Android P Emojis and Fonts Magisk Module (download for free) on your device.
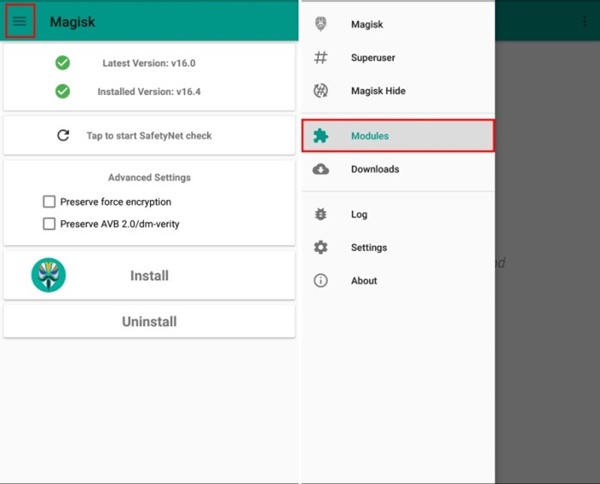
2. Then, open Magisk Manager and tap on the upper hamburger menu, Now, tap on “Modules”.
3. Tap on the “+” icon at the bottom of the screen and navigate to the folder where you download the Android P Emoji and font module and select that.
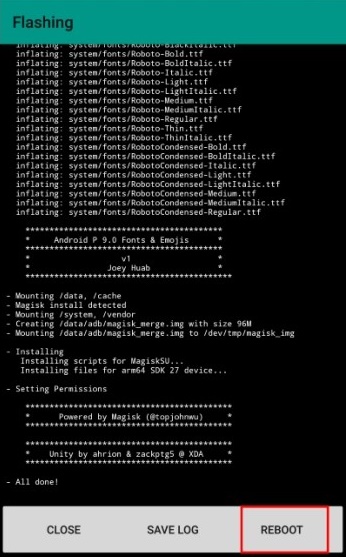
4. The Magisk Manager will automatically start flashing the Android P Emojis and Fonts module on your device. Once finished, just tap on “Reboot” available at the bottom-right on your screen. Now, you can use Android P Emojis and Fonts on your Android device.
Final Words: Enjoy Android P Emojis and Fonts on Any Android Smartphone
I hope you find this tutorial useful to Install Android P Emojis and Fonts on Any Android Device. I am looking for some more ways to use each and every Android P features on any Android device. The credits for this amazing Magisk module goes to XDA’s senior member joeyhuab. So, Do you like the above tutorial? Share your views in the comments section below. For more, Stay tuned with Tech4Fresher.


