Every time we face an internet issue, we try to come up with a solution that can help other users. But if I talk about – “WiFi connected no internet access” issue, there isn’t any specific solution. It could be your device or your router or even some settings which are restricting Internet access.
Today, I will share some simple ways to fix wifi connected but no Internet issue. This is going to be a step by step solution which will help you know where to look at for the Internet issues and how to fix them. Here, I am focusing on fixing the Internet of a Windows Computer.
Related: 7 Best WiFi Analyzer For Windows 10/8/7
Where to Look for Issues in Case of WiFi Connected No Internet Access?
When one of your devices having a hard time to connect to the Internet, chances are there is some issue with your device or its WiFi adapter or some router’s settings. If you are facing Internet connection issues on all device in a WiFi network, there might be some problem with your modem or router. you can even check if the ADSL wire doesn’t get twisted or damaged.
Here are the steps to fix WiFi connected no Internet problem in the easiest way:
1. Check Modem/Router’s LED
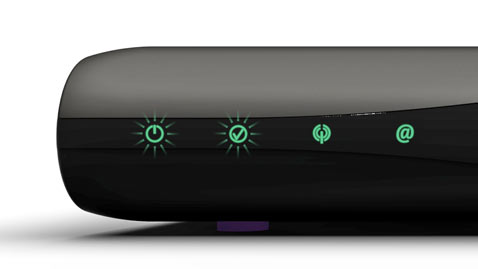
First of all, check for your Internet connectivity and ensure it’s working fine. Looking at the LED lights of your modem or router, you can easily determine its state.
In most of the cases, the lights should be simple ON and WiFi indicator LED should blink. If you cannot see such things or observe any unusual blinking of lights, contact your Internet Service Provider (ISP) to confirm if there’s any problem with the Internet and when it will get resolved.
2. Restart Device
There are so many issues which get resolved just by restarting your device. So, I always prefer doing this before trying any specific solution.
If you are already tired of doing this many times, then I am sorry. But, restarting helps to fix many network-related problems. So for the sake of following this tutorial completely, turn OFF of your modem and router both for at least 60 seconds. Now turn them ON and try connecting again. If the issue is still there, keep reading the ways to fix WiFi connected no Internet issue.
3. Check for Device Related Issues
There are cases in which other devices are able to connect to the Internet except for your device. In this case, there may be some issues with your device or its WiFi adapter.
Like router and modem, a simple restart often fixes some common network and software related issues. So, restart your device and see if that solves the WiFi connected but no Internet access issue. If not, follow the steps below.
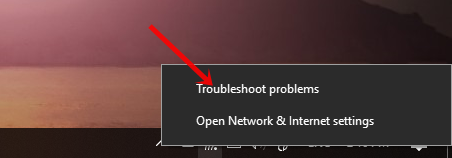
- Right-click on the WiFi icon shown at the bottom-right of the taskbar. Click on “Troubleshoot Problems“.
- Now, Windows will automatically look for issues and will try to fix it for you.
- If Windows is unable to fix the device or network related issue, it may also tell you about the problem. So that you can search online or ask an expert.
Related: 6 Ways to Fix “No Internet Secured” Error on Windows 10
4. DNS Cache
Whenever you enter a URL on your browser, your system reads the URL and look up in the DNS cache. If your request matches the pages available in the cache, the operating system loads the pages from cache instead of fetching them from the server.
This makes the process fast and the website loads in no time. But sometimes the DNS cache got corrupted to due unauthorized domain’s access and technical glitches and ultimately become invalid.
Also Read: What is Domain Name Server (DNS) and How it Works?
This cache restricts you from accessing the Internet because there may be a mismatch occurred in the IP addresses. To fix this issue, flush the DNS cache by following the steps below.
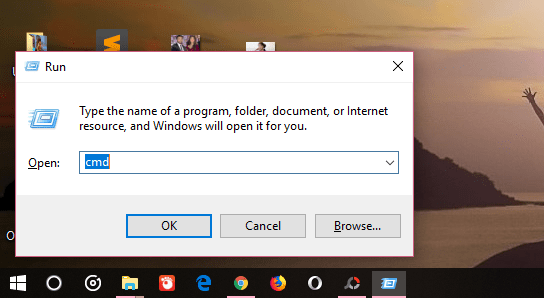
- Press Windows + R to open run command pop-up and type “cmd.” This will open the command prompt.
- Now, type the following command and press enter. It will flush out the DNS cache.
ipconfig/flushdns
5. Outdated WiFi Modes
There are many kinds of Wireless modes in a router like 802.11 b, 802.11 b/g, 802.11 b/g/n, etc. These b, g, n and ac are wireless standards defined by IEEE to ensure uniformity across all the models of routers. Here, b is the oldest and only works in smaller range whereas ac is the lastest and can support up to Gbps of speed.
Now, if you are able to use the Internet on connecting your computer via ethernet cable but not with the WiFi, then there may be some compatibility issue between the device and router’s Wireless mode. Usually, It is set to 802.11 b/g/n/ and works for most people. But if you are facing – WiFi connected no internet access problem in an old device, you should try changing this wireless mode.
How to Change Wireless Mode of a WiFi Router?
Step 1: First of all, go to any internet browser and log in to your WiFi router dashboard. The settings’ page address is usually 192.168.0.1 or 192.168.1.1 and the default username & password are admin and admin. Otherwise, you can check users manual of your router or even Google for your router.
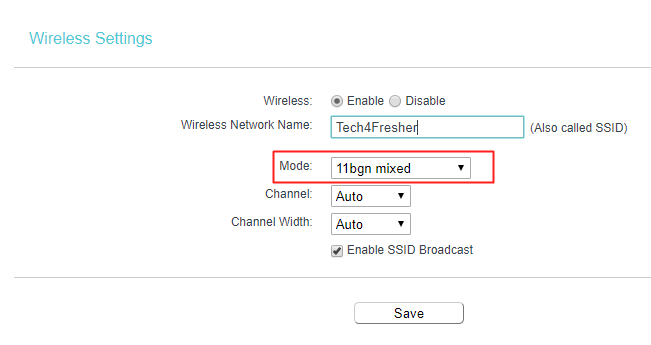
Step 2: Now, look for the Wireless Mode option. It’s usually under Wireless settings.
Step 3: Then, click on the drop-down menu next to Wireless mode, select 802.11 b and save changes.
Step 4: Finally, restart the WiFi and see whether it solved the problem. If not, try 802.11 g. If this fixed the issue, congratulations. Otherwise, move to the next solution.
6. IP Address Conflict
If you are able to use the Internet by connecting your device to other WiFi networks, but not with your own WiFi, then there may IP Address or DNS conflict. You can check this by pinging your router from the cmd (ping <ip address or default gateway of the router). If you get a timeout response, then it’s probably the IP Address conflict.
To solve this problem, press Windows + R and go to cmd. Then, type the command below and press enter. It will release the captured IP Address and the DHCP server will assign a new IP Address to your computer.
ipconfig/release
If the above solution doesn’t worked for you, follow the below steps to set your network settings to automatically obtain an IP address and DNS given by your ISP.
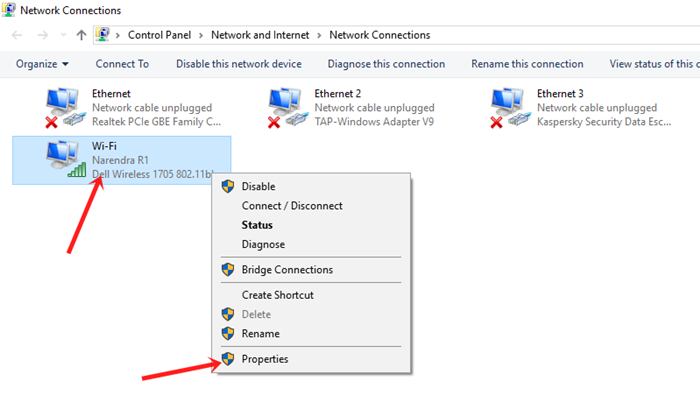
Step 1: Press Windows+R on your Windows computer, type ncpa.cpl and press enter. It will open a Network connections window. Here, look for your WiFi network, right-click on it and select Properties.
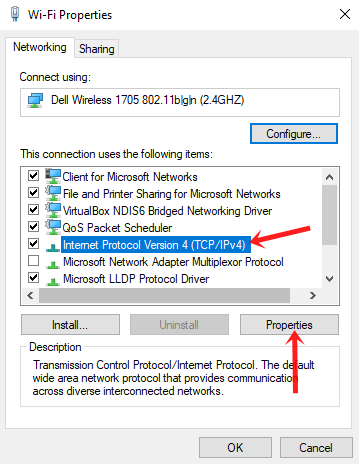
Step 2: Click on “Internet Protocol Version 4” and then click on the Properties button given below.
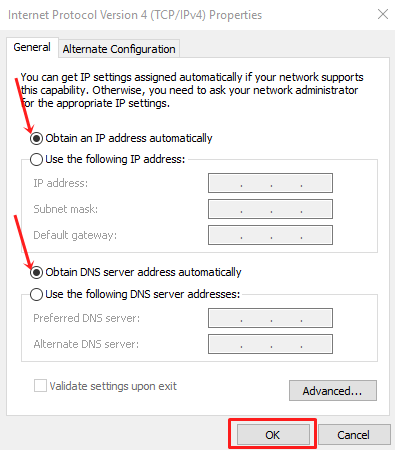
Step 3: Now, select “Obtain an IP address automatically” and “Obtain DNS server address automatically” both and click on OK. If, still your device is not connected, try restarting your PC.
7. Outdated Network Driver
Like all the software, the drivers also need to be updated regularly. An old or corrupted driver can also cause WiFi “connected no internet” error. Sometimes, you can see a small yellow icon next to your device name indicating this problem. So, just follow the steps below to update the Network driver.
Step 1: First of all Press Windows+R, type devmgmt.msc and press enter. This will open your Device Manager.
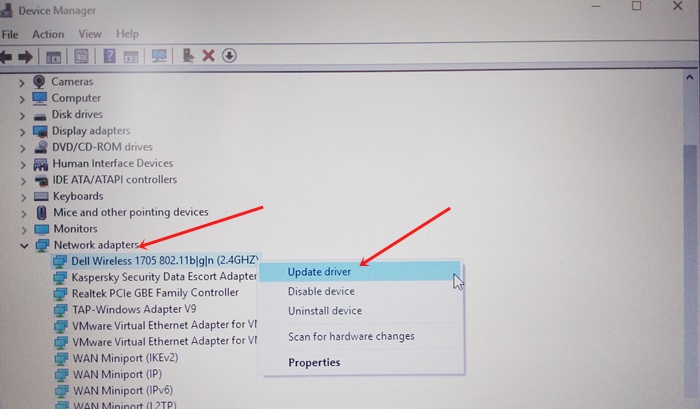
Step 2: Then, click on Network Adapters and right-click on your WiFi driver.
Step 3: Now, select Update driver option. Finally, click on “Search automatically for updated driver software” and that’s it.
8. Reset Your Router
If you are still facing no internet access issue, then maybe now it’s a time to reset your WiFi router.
Note: Resetting your router will move the router to its default factory settings. And, you have to do the basic setup and password protection again.
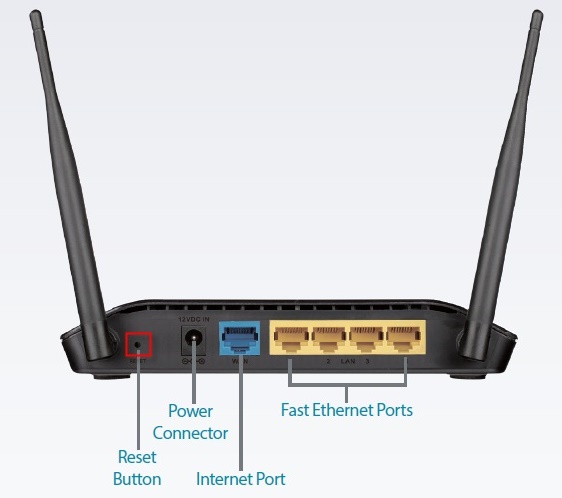
Talking about the easiest way to reset your WiFi router, you will find a small reset button at the back panel (in most of the cases) of the router. Just press and hold it for 10 – 15 seconds, or until all the router lights start to blink. This will reset your router.
Note: Don’t forget to log in to your router’s dashboard before resetting and note down the username and password used to login into your ISP’s server. You may need it while setting up your router again.
9. Network Reset
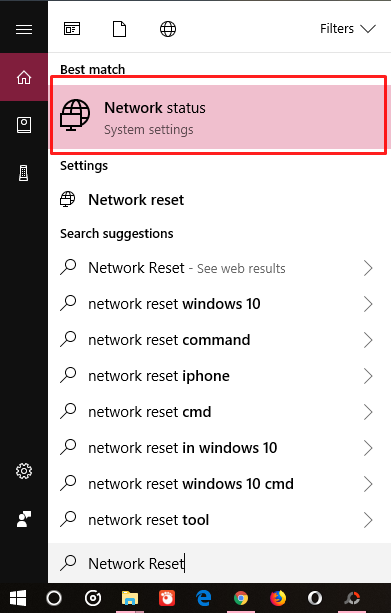
Network Reset basically disable, uninstall and reinstall your network adapters. It will erase saved ethernet, WiFi and VPN networks. Windows will forget all your saved WiFi credentials. If you are using Windows 10, just click on the start icon and type – Network Reset.
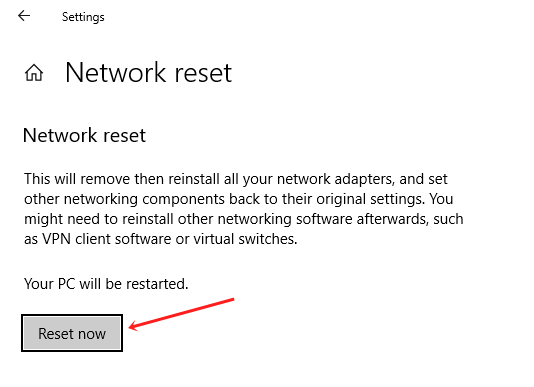
You will see Network reset option with a warning about what will happen with your network. Just click on “Reset now”. It will reset the network and restart your PC/Laptop.
10. The Ultimate Option – Professional Help
Unfortunately, if none of the above solutions was able to fix WiFi connected but no Internet access issue. Then, it might be some other technical, hardware or network related issue which is beyond our reach. So, it would be better to call your Internet service provider to ask for on-call instructions or request a service agent to come and fix the problem for you.
Also Read: How to Fix ERR_Connection_Refused Error in Chrome
Conclusion: Wifi Connected No Internet Access
I hope the above ways will solve your no internet access problem. We have also followed these steps several times to fix WiFi connected but no Internet access. These steps should be able to solve most of the software related issues, but if your Internet is not working due to a hardware fault, you should contact an expert serviceman.

