Apple Mail is the default email app on the iPhone and other iOS devices. There are various useful tips on offer by Apple mail for users. To help the users make effective use of the app as and when required, it becomes imperative to understand some useful tips and tricks on how to use Apple Mail like a pro!
Also Read: Apple AirTag: An Innovative Tracker with Precision Finding Technology
How to use Apple Mail like a Pro
1. With a Single Touch, Mark all Email as Read
Your iPhone’s home screen can be annoying when you get notifications about the unread emails, even though you might have read a few and might have postponed the rest of the emails for later. A new email in your inbox will be added along with the other unread emails. Apple Mail offers users a quick option to mark all emails as read at once.
Follow the below-mentioned steps.
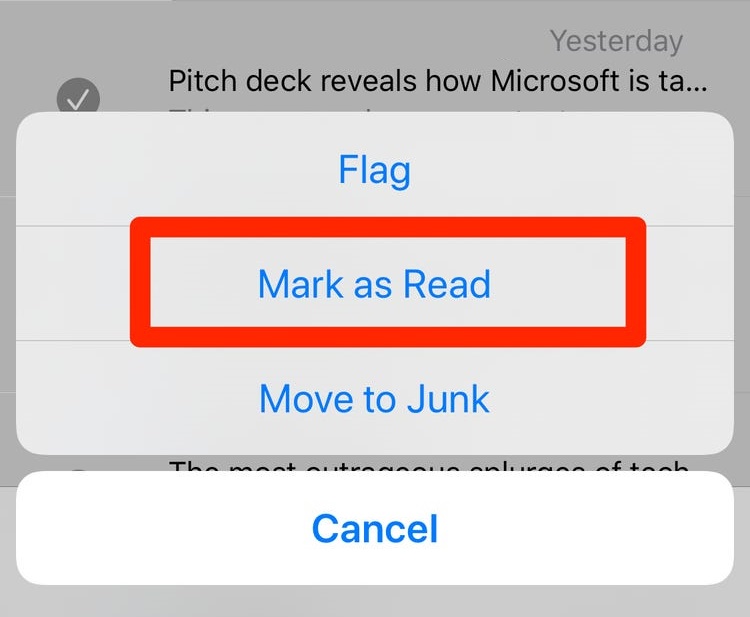
- Open Mail
- Click ‘All Inbox’
- Select Edit
- Choose the ‘Select All’ option
- From the list of four action buttons provided, the user will have to click the option denoted as ‘Mark as Read’
- All the emails have been marked as read now.
2. Include a New Account or Eliminate an Existing Account
Compared to other email applications, Apple Mail does not allow you to directly add or remove any email accounts that have been added. Follow these steps to add/remove an account.
Add an Account
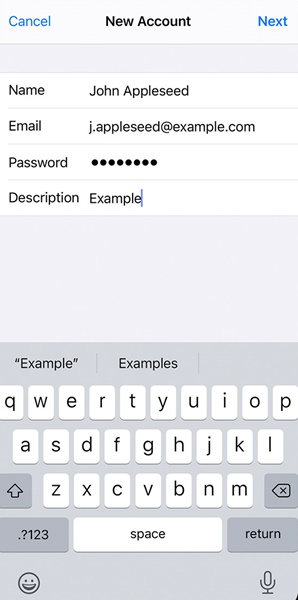
- Head towards ‘Settings’
- Click the option denoted as ‘Password & Accounts’
- Choose the option ‘Add Account’
- Once an email account is added successfully, the same will be displayed within the mailbox.
Remove an Account
- You can select an email account
- Click ‘Toggle Off’, and the account will be disabled.
Similarly, you can also disable or enable by toggling on or off applications such as Calendars, Contacts, and Reminders.
3. Getting a glance at more information in an email on the Home Screen
As we all know, most users can view only two lines as a preview of their email by default whenever notifications are received on the home screen. However, an Apple Mail provides the user with an option to increase the preview lines from 2 lines to a maximum of 3, 4, or even 5 lines. This helps the user read a good chunk of the email content as a preview from the home screen instead of opening the Apple Mail application.
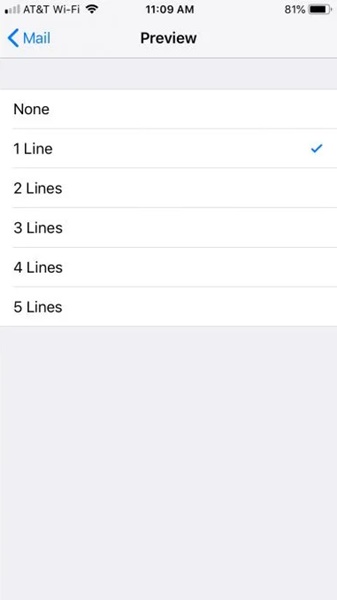
Steps
- Navigate to ‘Settings’
- Open ‘Mail’ application
- Select ‘Preview Lines’
- Select from the list of options available such as None, 1 Line, 2 Lines, 3 Lines, 4 Lines, and 5 Lines
4. Save Email as PDF in Mail on Mac
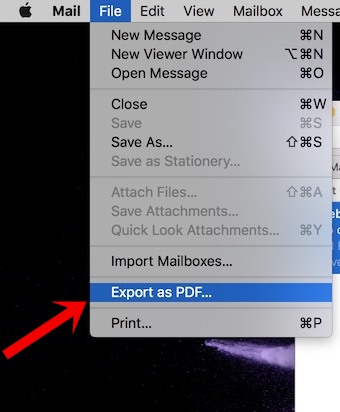
Apple Mail application in your Mac allows a user to save emails as files or PDFs on a Mac computer. You will have to choose one or more messages or conversations. For saving as PDF, select ‘File’ and choose ‘Export as PDF’. For saving messages as files, select ‘File’ and select a format for saving the file under ‘Save As’. You can read more about it here.
5. Stay Updated about important emails
Even though it is quite easy to mark all emails as ‘Read’ using the Apple Mail application, the same may not be desirable for marking some important emails that you should not have missed out by blandly marking as ‘read’.
Therefore Apple Mail provides users with a VIP inbox function. In the VIP inbox, you can include email addresses, such as banks that send you emails, and enable custom alerts for such emails that you receive from banks.
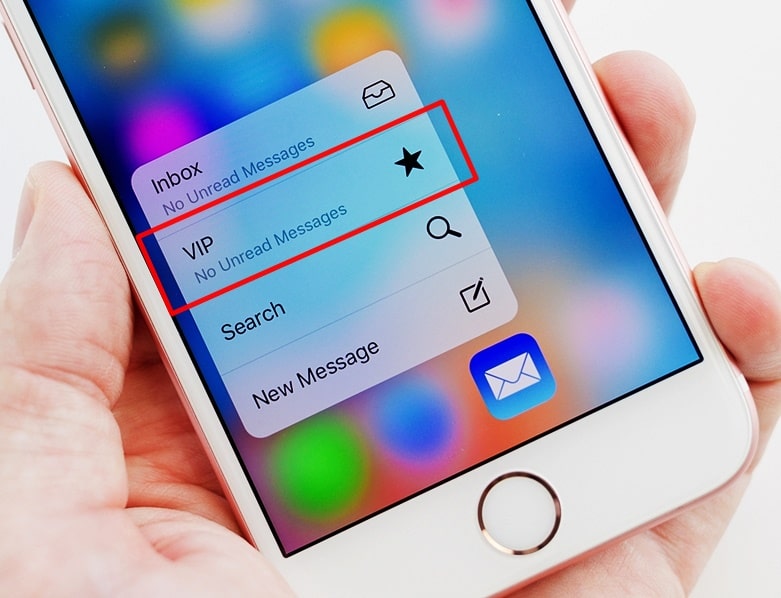
Steps
- Open Apple Mail
- Click on the name of the sender
- Click the option denoted as ‘Add VIP’
- The VIP emails will display in a separate VIP inbox on the home screen of your iOS device.
- A user can also customize the VIP inbox alerts by clicking the ‘I’ button.
6. Prompt the user before deleting an Email
Deleting an email from Apple Mail is the quickest thing to do. All a user has to do is to swipe left the email which they want to delete. However, the problem is that Apple Mail will not ask you before deleting an email. However, if you change your mind during the delete process, you can get a prompt message before confirming the delete process of an email.

Steps
- Navigate to ‘Settings’
- Click ‘Mail’
- Enable or Toggle On the button next to ‘Ask Before Deleting’
4. From now on, the app will ask you to confirm deleting an email before its deleted
Also Read: How to Factory Reset iPhone?
7. Switch Default Account
There is no need to change a default account if only one account has been added. This is because apple Mail will consider the account as the default account for sending emails. However, in scenarios where one or more account is added, you will have to change the default account as and when required.
Steps
- Go to ‘Settings’
- Click ‘Mail’
3. Select the option denoted as ‘Change Default Account’
4. Choose the account which you want to switch to from the list of options provided
Conclusion
Apple Mail continues to be a very productive application you can enjoy on Mac or iOS devices. It is more than just a basic email application. We are sure that this article might have helped you know more about the various useful tips to use Apple Mail like a pro user.


")


")