Internet slowing down for no apparent reason? We get it – the frustration of a laggy connection is real. The good news? Fixing it is simpler than you think.
In this guide, we’ll walk you through the simple steps of flushing ARP cache in Windows 10 and 11. No tech jargon, no complex procedures – just straightforward solutions.
If you are also facing network hiccups due to presense outdated or incorrect information in the ARP cache, let me take you through the steps to clear ARP cache for Windows 10 and 11. And make your online experience a breeze.
Also Read: Why is My Internet So Slow? (And How to Fix it!)
What is ARP Cache?
ARP, which stands for Address Resolution Protocol, is like a digital phone book for devices on your Wi-Fi. It helps your gadgets talk to each other. The ARP Cache is like a memory bank in your computer, storing these phone numbers. Sometimes, this memory can get mixed up, causing internet problems.
Here’s the thing: only devices on your Wi-Fi can change this memory. Imagine ARP messages as public announcements in your neighborhood. Devices that can hear these announcements update their memory accordingly. So, someone on your Wi-Fi, intentionally or even unknowingly, can mess with this memory.
Changing the ARP Cache is serious business. Usually, it needs fixing when someone tries to force a change that the system doesn’t support, making things worse. So, it’s best to avoid messing with it unless you really know what you’re doing
You may also like: How to Clear Cache in Chrome, Firefox and Edge Browser
How to Clear ARP Cache in Windows 10
Clearing ARP Cache requires the execution of a single command. But prior to that, you need to stop the ‘Routing and Remote Access’ services. Follow the steps down below to properly clear ARP Cache.
Note: The screenshots added below are of Windows 10 PC but the steps are exactly same for Windows 11 also.
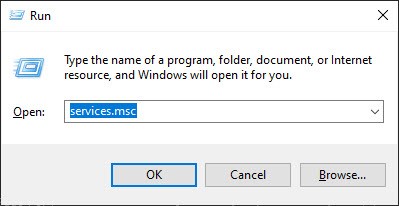
Step 1: First press the ‘Windows + R’ key to bring forth the ‘Run’ dialogue box. Type in, ‘services.msc’ and hit enter.
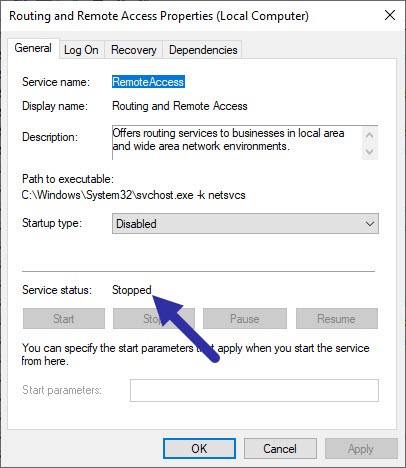
Step 2: Within the services window, look for the ‘Routing and Remote Access’ service and right-click on it. Now select ‘Properties.’

Step 3: Make sure that the ‘Service Status’ is set to ‘Stopped.’ If not, click on ‘Stop’ and hit ‘Apply.’
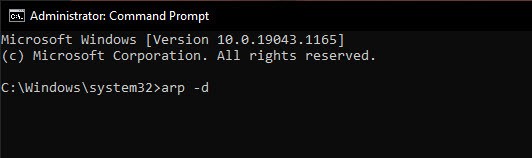
Now that you have stopped the service, you can flush out the ARP cache. Simply head over to the start menu, and search for ‘Command Prompt’, and right-click to ‘Run as administrator.’ With administrator privileges, you can make networking changes to your PC.
Step 4: Once you are in the command prompt, type in ‘arp –d’ and hit enter. This will clear out all the ARP cache.
The ‘netsh’ is yet another effective tool to clear out ARP Cache. Execute the command ‘netsh interface IP delete arpcache’ and hit enter. You can also read our article on best CMD commands you should know.
Now clear the command prompt and reboot your system. Based on your LAN connection, Windows will create a new ARP Cache. You don’t have to do anything manually anymore. Chances are, it would fix your network issue with ARP Cache.


")